
The Problem
Self-hosted GitLab behind Cloudflare Tunnel breaks Docker image pushes. Login works fine:
docker login registry.example.com:5443
Authenticating with existing credentials... [Username: your-username]

i Info → To login with a different account, run 'docker logout' followed by 'docker login'


Login Succeeded
Layers start uploading:
docker push registry.example.com:5443/myproject/myimage:latest
The push refers to repository [registry.example.com:5443/myproject/myimage]
5f70bf18a086: Preparing
a3b5c80a4eba: Preparing
7f18b442972b: Preparing
5f70bf18a086: Pushing [==============>                    ]  15.3MB/50.1MB
a3b5c80a4eba: Pushing [========================>          ]  28.1MB/45.2MB
Then it dies:
unauthorized: authentication requiredCloudflare Tunnel chokes on Docker Registry’s chunked uploads and long-lived connections.
The Solution: Hybrid Approach
Split the traffic:
- GitLab UI → Cloudflare Tunnel (DDoS protection, no exposed ports)
- GitLab Registry → Direct port forwarding via OPNsense (handles large uploads)
Architecture Overview
┌─────────────────────────────────────────────────────────────────┐
│                         INTERNET                                │
└─────────────────────────────────────────────────────────────────┘
         │                                    │
         │ gitlab.example.com                 │ registry.example.com
         │ (Cloudflare Tunnel)                │ (Direct - Port 5443)
         ▼                                    ▼
┌─────────────────────┐              ┌─────────────────────┐
│  Cloudflare Edge    │              │    OPNsense WAN     │
│  (Tunnel Endpoint)  │              │  (Port Forward)     │
└─────────────────────┘              └─────────────────────┘
         │                                    │
         │                                    │ NAT: 5443 → 192.168.100.22:5443
         ▼                                    ▼
┌─────────────────────────────────────────────────────────────────┐
│                    LAN (192.168.100.0/24)                       │
│                                                                 │
│   ┌─────────────────────────────────────────────────────────┐   │
│   │              GitLab VM (192.168.100.22)                 │   │
│   │                                                         │   │
│   │   ┌──────────────────┐    ┌──────────────────────┐      │   │
│   │   │   GitLab Web     │    │   GitLab Registry    │      │   │
│   │   │   (Port 80/443)  │    │   (Port 5443)        │      │   │
│   │   │   via Tunnel     │    │   via Port Forward   │      │   │
│   │   └──────────────────┘    └──────────────────────┘      │   │
│   │                                                         │   │
│   └─────────────────────────────────────────────────────────┘   │
│                                                                 │
└─────────────────────────────────────────────────────────────────┘
Prerequisites
You need:
- OPNsense firewall (any recent version)
- GitLab instance on a VM (e.g., 192.168.100.22)
- Domain with DNS management access
- SSL certificate (Let’s Encrypt or other)
- Basic NAT/port forwarding knowledge
Part 1: GitLab Configuration
Step 1: Configure GitLab for Separate Registry URL
Edit /etc/gitlab/gitlab.rb:
# Main GitLab URL (via Cloudflare Tunnel)
external_url 'https://gitlab.example.com'

# Registry with separate URL (direct access)
registry_external_url 'https://registry.example.com:5443'

# Registry configuration
gitlab_rails['registry_enabled'] = true
gitlab_rails['registry_host'] = "registry.example.com"
gitlab_rails['registry_port'] = "5443"
gitlab_rails['registry_api_url'] = "http://127.0.0.1:5000"

# Registry nginx configuration
registry_nginx['enable'] = true
registry_nginx['listen_port'] = 5050
registry_nginx['listen_https'] = true

# SSL certificates for registry
registry_nginx['ssl_certificate'] = "/etc/gitlab/ssl/registry.example.com.crt"
registry_nginx['ssl_certificate_key'] = "/etc/gitlab/ssl/registry.example.com.key"

# Important: Allow registry to be accessed on different port
registry_nginx['proxy_set_headers'] = {
  "Host" => "$http_host",
  "X-Real-IP" => "$remote_addr",
  "X-Forwarded-For" => "$proxy_add_x_forwarded_for",
  "X-Forwarded-Proto" => "https",
  "X-Forwarded-Ssl" => "on"
}Make sure to use the same domain in registry_external_url that you’ll configure in DNS and OPNsense. The SSL
certificate must match this domain.
Step 2: Generate or Install SSL Certificate
Get a cert for the registry domain:
sudo apt install certbot

sudo certbot certonly --standalone -d registry.example.com
Troubleshooting: Port 80 Already in Use
You might see:
- - - - - - - - - - - - - - - - - - - - - - - - - - - - - - - - - - - - - - - -
Could not bind TCP port 80 because it is already in use by another process on
this system (such as a web server). Please stop the program in question and then
try again.
GitLab holds port 80. Stop it first:
sudo gitlab-ctl stopWait a minute, retry:
sudo certbot certonly --standalone -d registry.example.com
Saving debug log to /var/log/letsencrypt/letsencrypt.log
Requesting a certificate for registry.example.com

Successfully received certificate.
Certificate is saved at: /etc/letsencrypt/live/registry.example.com/fullchain.pem
Key is saved at:         /etc/letsencrypt/live/registry.example.com/privkey.pem
This certificate expires on 2026-03-16.
These files will be updated when the certificate renews.
Certbot has set up a scheduled task to automatically renew this certificate in the background.

- - - - - - - - - - - - - - - - - - - - - - - - - - - - - - - - - - - - - - - -
If you like Certbot, please consider supporting our work by:
 * Donating to ISRG / Let's Encrypt:   https://letsencrypt.org/donate
 * Donating to EFF:                    https://eff.org/donate-le
- - - - - - - - - - - - - - - - - - - - - - - - - - - - - - - - - - - - - - - -
# Copy to GitLab SSL directory
sudo mkdir -p /etc/gitlab/ssl
sudo cp /etc/letsencrypt/live/registry.example.com/fullchain.pem \
/etc/gitlab/ssl/registry.example.com.crt
sudo cp /etc/letsencrypt/live/registry.example.com/privkey.pem \
/etc/gitlab/ssl/registry.example.com.key
sudo chmod 600 /etc/gitlab/ssl/*Step 3: Reconfigure GitLab
sudo gitlab-ctl reconfigure
sudo gitlab-ctl restart

# Expected results
ok: run: alertmanager: (pid 69369) 1s
ok: run: gitaly: (pid 69385) 0s
ok: run: gitlab-exporter: (pid 69410) 0s
ok: run: gitlab-kas: (pid 69424) 1s
ok: run: gitlab-workhorse: (pid 69439) 0s
ok: run: logrotate: (pid 69457) 1s
ok: run: nginx: (pid 69466) 0s
ok: run: node-exporter: (pid 69479) 0s
ok: run: postgres-exporter: (pid 69485) 0s
ok: run: postgresql: (pid 69494) 0s
ok: run: prometheus: (pid 69496) 0s
ok: run: puma: (pid 69518) 1s
ok: run: redis: (pid 69523) 0s
ok: run: redis-exporter: (pid 69531) 1s
ok: run: registry: (pid 69540) 0s
ok: run: sidekiq: (pid 69567) 0s
Step 4: Verify Registry is Running
# Check registry status
sudo gitlab-ctl status registry

# Check registry nginx status
sudo gitlab-ctl status nginx

# Verify registry is listening on port 5443
sudo ss -tlnp | grep 5443
# Should show: tcp   LISTEN 0  511  0.0.0.0:5443  0.0.0.0:*

# Test registry locally
curl -k https://127.0.0.1:5443/v2/

# Should return: {"errors":[{"code":"UNAUTHORIZED","message":"authentication required","detail":null}]}
# This is GOOD - registry is working, just requires authentication
Step 5: Configure GitLab VM Firewall (CRITICAL)
Your VM’s OS firewall may block port 5443 even though GitLab is listening. Open it.
This step is often overlooked but is required for the registry to be accessible from outside the VM. Without this, you’ll get connection timeouts even from within your LAN.
Using UFW (Ubuntu/Debian)
# Check if UFW is active
sudo ufw status

# Allow port 5443 from anywhere
sudo ufw allow 5443/tcp

# Or restrict to your LAN only (more secure)
sudo ufw allow from 192.168.100.0/24 to any port 5443 proto tcp

# Reload firewall
sudo ufw reload

# Verify the rule was added
sudo ufw status numbered
Step 6: Test from LAN
Run these from another machine on your network, not the GitLab VM:
# Test port connectivity (from your local machine, NOT the GitLab VM)
nc -zv 192.168.100.22 5443
# Should return: Connection to 192.168.100.22 port 5443 [tcp/*] succeeded!

# Test HTTPS (from your local machine)
curl -k https://192.168.100.22:5443/v2/
# Should return: {"errors":[{"code":"UNAUTHORIZED",...}]}If nc -zv times out, the firewall is still blocking the port. Double-check your firewall configuration and ensure
the rule is active.
Part 2: OPNsense Configuration
Three things: port forwarding, firewall rule, and NAT reflection.
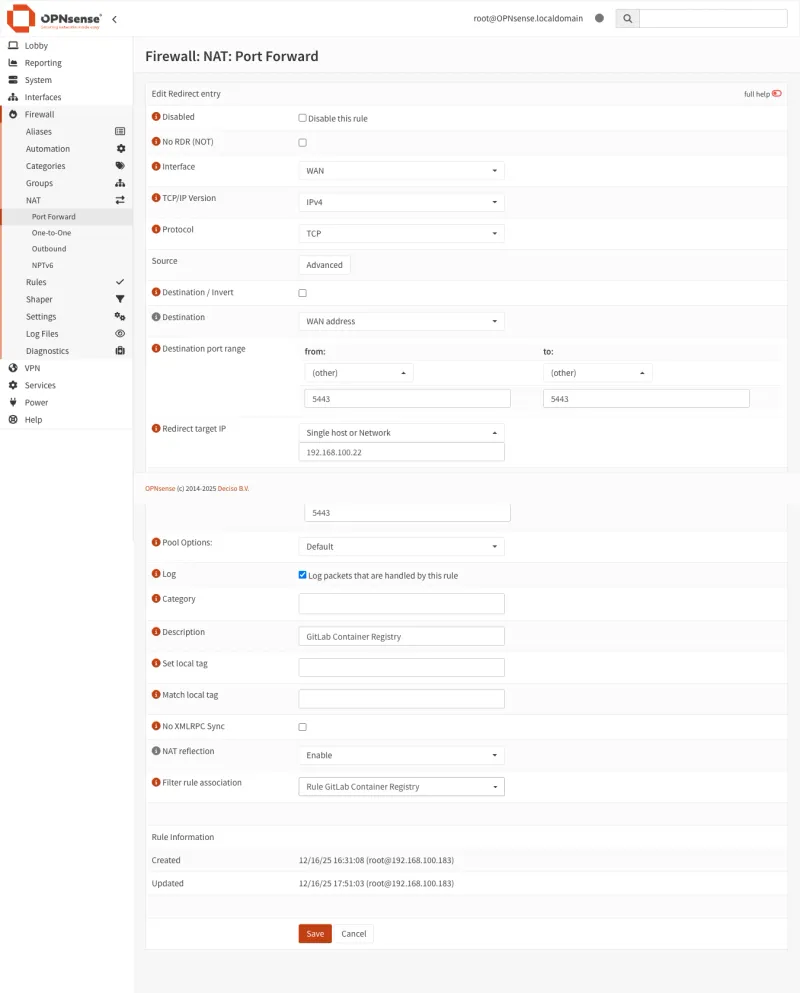
Step 1: Create Port Forward Rule
This redirects WAN traffic on port 5443 to your GitLab VM.
- Go to Firewall → NAT → Port Forward
- Click + Add
| Setting | Value | Explanation |
|---|---|---|
| Interface | WAN | Traffic coming from the internet |
| Protocol | TCP | Docker Registry uses TCP protocol |
| Destination | WAN address | Your router’s public IP |
| Destination port range | From: 5443, To: 5443 | External port clients connect to |
| Redirect target IP | 192.168.100.22 | Your GitLab VM’s internal IP |
| Redirect target port | 5443 | GitLab registry_nginx listening port |
| Description | GitLab Container Registry | Helps identify this rule later |
| NAT reflection | Enable | Allows LAN clients to use public DNS name |
| Filter rule association | Add associated filter rule | Auto-creates firewall rule to allow traffic |
Click Save then Apply Changes.
Flow: Internet → Public IP:5443 → OPNsense → 192.168.100.22:5443 → GitLab Registry
Port Mapping Flow: External traffic arrives at WAN port 5443 → forwards to GitLab VM’s registry_nginx on port 5443 → which proxies internally to the registry backend on 127.0.0.1:5000.
Using port 5443 avoids conflicts with other services that might be using standard port 443 on your WAN. This is the recommended approach for dedicated registry access.
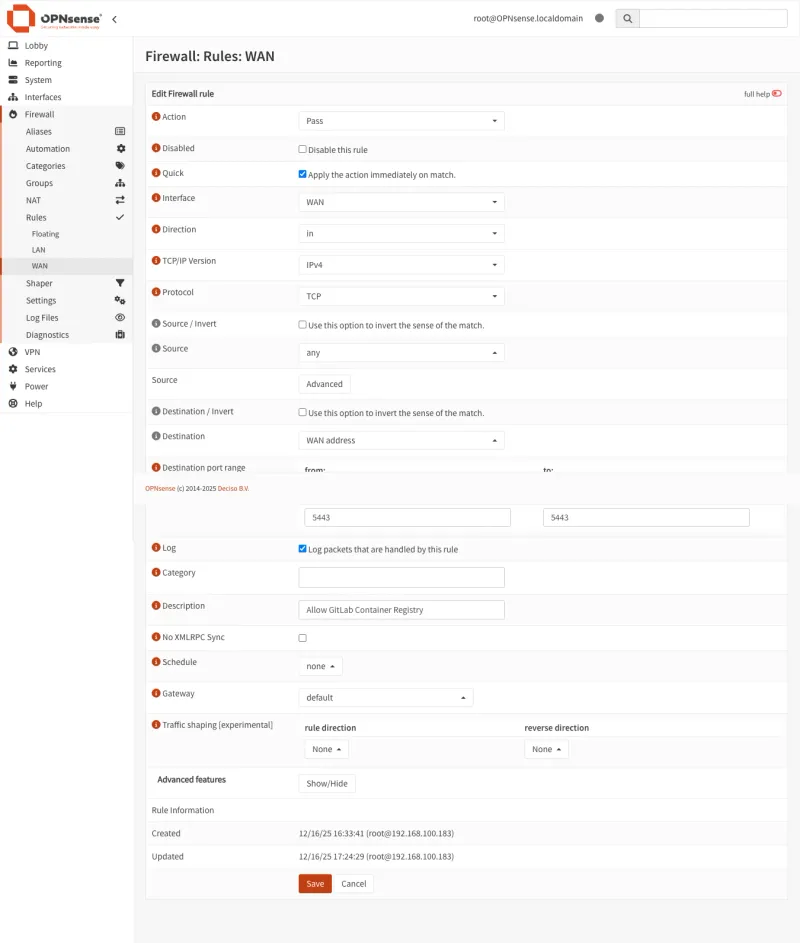
Step 2: Create/Verify Firewall Rule
A port forward alone won’t pass traffic. You need a firewall rule too.
If you selected “Add associated filter rule” in Step 1, it already exists. Check Firewall → Rules → WAN.
Otherwise, create it:
- Go to Firewall → Rules → WAN
- Click + Add
| Setting | Value | Explanation |
|---|---|---|
| Action | Pass | Allow this traffic through the firewall |
| Interface | WAN | Apply rule to traffic coming from the internet |
| Direction | in | Only incoming traffic (not outgoing) |
| Protocol | TCP | Docker Registry uses TCP protocol |
| Source | Any | Accept connections from any IP (or restrict for security) |
| Destination | WAN address | Traffic destined for your router’s public IP |
| Destination port | 5443 | Only allow traffic to port 5443 (the registry port) |
| Description | Allow GitLab Registry | Helps identify this rule later |
Click Save and Apply Changes.
Without this rule, traffic gets dropped silently.
Step 3: Configure NAT Reflection (Optional but Recommended)
NAT reflection (hairpin NAT) lets LAN devices reach the registry using the public DNS name instead of the internal IP.
Without it, LAN clients hitting registry.example.com:5443 try to reach your public IP from inside the network, which fails.
DNS override (Step 4) solves the same problem. Enabling both gives redundancy.
- Go to Firewall → Settings → Advanced
- Find Reflection for port forwards under Network Address Translation
- Set to Enable (or Pure NAT for better performance)
- Click Save
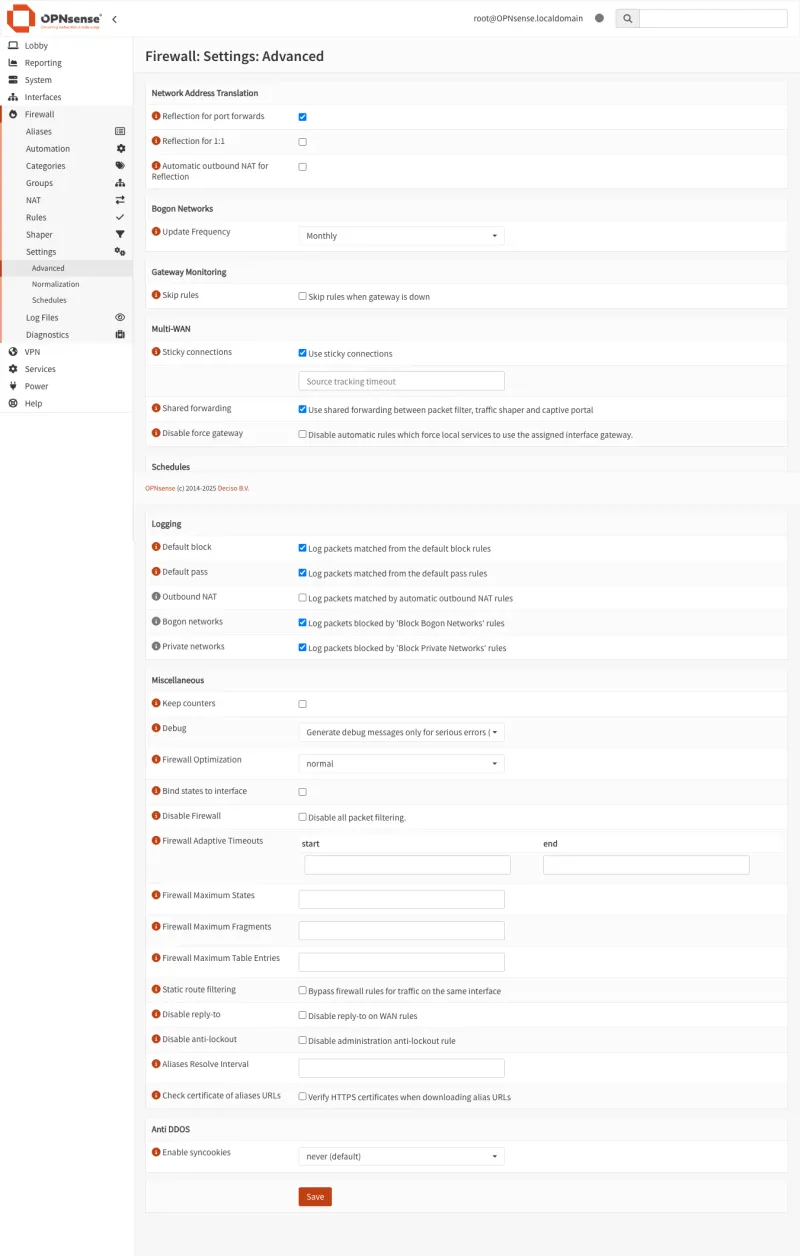
You can also enable reflection per-rule instead of globally.
Step 4: (Optional) Configure Local DNS Override
A DNS override points LAN clients directly at 192.168.100.22 instead of routing through the WAN.
Faster, works when WAN is down, less load on the router.
- Go to Services → Unbound DNS → Overrides
- Click + Add
| Setting | Value | Explanation |
|---|---|---|
| Host | registry | The subdomain part (before the domain) |
| Domain | example.com | Your actual domain name |
| Type | A (IPv4 address) | IPv4 address record |
| IP address | 192.168.100.22 | Your GitLab VM’s internal IP |
- Click Save and Apply
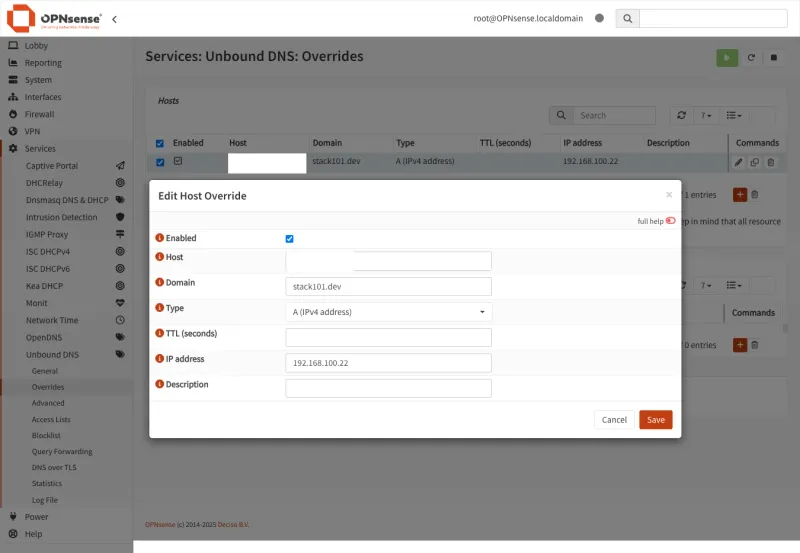
LAN devices now resolve registry.example.com to 192.168.100.22 directly. External clients still hit your public IP.
Verify with nslookup registry.example.com from an internal device. You should see 192.168.100.22.
Part 3: DNS Configuration
Step 1: Create DNS Record
Add an A record for registry pointing to your public IP:
| Type | Name | Value | TTL |
|---|---|---|---|
| A | registry | YOUR_PUBLIC_IP | 300 |
On Cloudflare, set proxy status to DNS only (grey cloud). Docker Registry traffic cannot go through Cloudflare’s proxy.
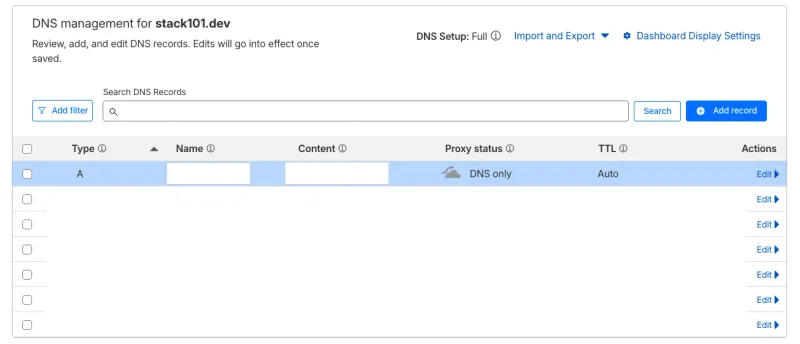
The registry DNS record MUST be “DNS only” (grey cloud), not proxied through Cloudflare. Docker Registry traffic cannot go through Cloudflare’s proxy.
Step 3: Verify DNS Resolution
# Check DNS resolution
nslookup registry.example.com

# Should return your public IP (or internal IP if using DNS override)
dig registry.example.com +short
Part 4: Testing the Setup
Step 1: Test from External Network
From outside your network (mobile hotspot works):
# Test HTTPS connectivity
curl -k https://registry.example.com:5443/v2/

# Should return: {"errors":[{"code":"UNAUTHORIZED","message":"authentication required","detail":null}]}
# This is expected - it means the registry is responding correctly
Step 2: Test Docker Login
# Login to registry
docker login registry.example.com:5443

# Enter your GitLab username and Personal Access Token
Step 3: Test Push/Pull
Push a real image:
# Pull Node.js image from Docker Hub
docker pull node:24.12.0-trixie-slim
24.12.0-trixie-slim: Pulling from library/node
f626fba1463b: Pull complete
e669be0904f2: Pull complete
5918935f1407: Pull complete
2ee9d466d7a4: Pull complete
cb778f43df8b: Pull complete
Digest: sha256:9ad7e7db423b2ca7ddcc01568da872701ef6171505bd823978736247885c7eb4
Status: Downloaded newer image for node:24.12.0-trixie-slim
docker.io/library/node:24.12.0-trixie-slim# Tag for your GitLab registry
docker tag node:24.12.0-trixie-slim \
registry.example.com:5443/base/docker-images/node:24.12.0-trixie-slim# Push to your GitLab registry
docker push registry.example.com:5443/base/docker-images/node:24.12.0-trixie-slimThe push refers to repository [registry.example.com:5443/base/docker-images/node]
65de0fe7aaa8: Pushed
300ab2bb9bfa: Pushed
5f1c02153132: Pushed
813c6273ce81: Pushed
742b5304df6e: Pushed
24.12.0-trixie-slim: digest: sha256:507fa69d79feec3c18afedfc4b7ab67d3fdd6f750631066ef34d4d5ea4595c04 size: 1367Success! If you see the “Pushed” messages and a digest, your image was successfully uploaded to your GitLab Container Registry.
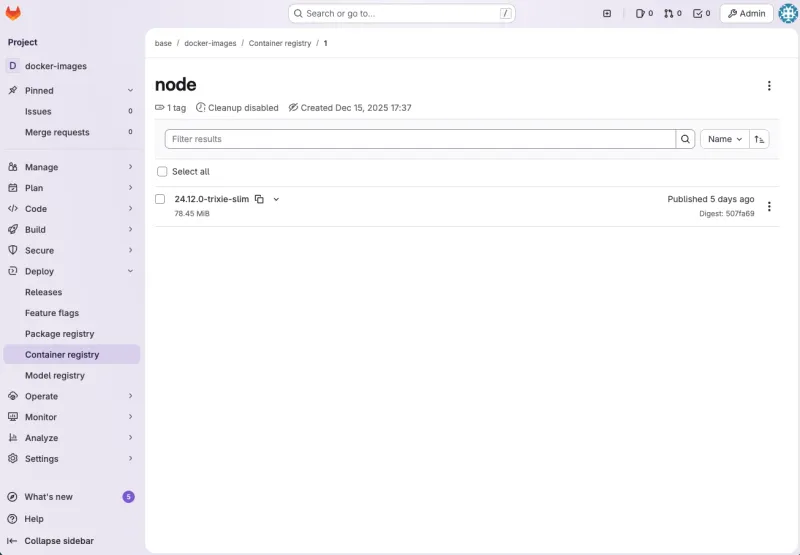
Step 4: Verify in GitLab UI
- Go to Deploy → Container Registry
- Your
nodeimage with tag24.12.0-trixie-slimshould appear
Step 5: Test Pulling from Registry
# Remove local image to test pull
docker rmi registry.example.com:5443/base/docker-images/node:24.12.0-trixie-slim

# Pull from your registry
docker pull registry.example.com:5443/base/docker-images/node:24.12.0-trixie-slim

# Use the image
docker run --rm registry.example.com:5443/base/docker-images/node:24.12.0-trixie-slim node --version
# Should output: v24.12.0
Part 5: Security Considerations
Restrict Access by IP (Recommended for Production)
- Create an Alias under Firewall → Aliases named
registry_allowed_ips. Add your office, home, and CI/CD runner IPs. - Update the WAN firewall rule: change Source from “Any” to the alias.
Enable Rate Limiting
Use OPNsense’s os-nginx plugin or GitLab’s built-in rate limiting in /etc/gitlab/gitlab.rb:
# Rate limiting for registry
registry['rate_limiting_enabled'] = true
registry['rate_limiting_threshold'] = 100
registry['rate_limiting_expiry'] = 1.hour
Use Fail2Ban
Block repeated failed auth attempts:
# Install fail2ban
sudo apt install fail2ban

# Create GitLab registry jail
sudo cat > /etc/fail2ban/jail.d/gitlab-registry.conf << 'EOF'
[gitlab-registry]
enabled = true
port = 5050
filter = gitlab-registry
logpath = /var/log/gitlab/registry/current
maxretry = 5
bantime = 3600
findtime = 600
EOF

# Create filter
sudo cat > /etc/fail2ban/filter.d/gitlab-registry.conf << 'EOF'
[Definition]
failregex = ^.*unauthorized.*client_addr=<HOST>.*$
ignoreregex =
EOF

# Restart fail2ban
sudo systemctl restart fail2ban
Part 6: Complete Configuration Summary
Final Architecture
| Component | URL | Path |
|---|---|---|
| GitLab UI | https://gitlab.example.com | Cloudflare Tunnel → GitLab (192.168.100.22) |
| GitLab Registry | https://registry.example.com:5443 | Internet → OPNsense (Port 5443) → GitLab (192.168.100.22:5443) |
GitLab Configuration (/etc/gitlab/gitlab.rb)
# External URL (via Cloudflare Tunnel)
external_url 'https://gitlab.example.com'

# Registry configuration (direct access)
registry_external_url 'https://registry.example.com:5443'
gitlab_rails['registry_enabled'] = true
gitlab_rails['registry_host'] = "registry.example.com"
gitlab_rails['registry_port'] = "5443"

# Registry nginx
registry_nginx['enable'] = true
registry_nginx['listen_port'] = 5443
registry_nginx['listen_https'] = true
registry_nginx['ssl_certificate'] = "/etc/gitlab/ssl/registry.example.com.crt"
registry_nginx['ssl_certificate_key'] = "/etc/gitlab/ssl/registry.example.com.key"
OPNsense Port Forward
| Setting | Value |
|---|---|
| Interface | WAN |
| Protocol | TCP |
| Destination | WAN address |
| Destination port | 5443 |
| Redirect target IP | 192.168.100.22 |
| Redirect target port | 5443 |
DNS Configuration
| Type | Name | Value | Proxy |
|---|---|---|---|
| A | gitlab | (Cloudflare Tunnel IP) | Proxied (orange) |
| A | registry | YOUR_PUBLIC_IP | DNS only (grey) |
Conclusion
This hybrid setup keeps Cloudflare’s DDoS/WAF protection on the GitLab UI while giving Docker Registry the direct connection it needs for large uploads.
It fixes the “unauthorized: authentication required” error caused by pushing through Cloudflare Tunnel.
Key Takeaways
- Cloudflare Tunnel can’t handle Docker Registry — upload limits and timeouts break pushes
- OPNsense port forwarding gives reliable direct access for registry traffic
- Use separate domains for GitLab UI and Registry
- SSL certificates are required for both endpoints
- Restrict registry access to known IPs when possible