Your ISP gives you a modem/router combo and calls it a firewall. It is not. You cannot inspect its logs, write per-device rules, enable DNS filtering, or run IDS/IPS. All your home traffic passes through a box you do not own, cannot extend, and mostly cannot see inside.
This guide fixes that. By the end, OPNsense will sit between your ISP and every device in your home — on an Intel N100 MiniPC drawing about 6W idle, running on top of Proxmox.
Target audience: Homelab users comfortable with Linux CLI and basic networking.
Environment: MiniPC T9 Plus (Intel N100, 2x Realtek RTL8111/8168 GbE NICs), Proxmox VE 9.1.6, OPNsense 26.1.2, FPT Vietnam fiber (PPPoE).
The Problem With My ISP Router
FPT Vietnam (and most ISPs) provide an optical fiber connection with a modem/ONT and a combined router AX3000CV2. An 880 MHz dual-core CPU is fine for routing/NAT but weak for:
- IDS/IPS (Suricata)
- Advanced firewall rules
- VLAN segmentation
- DNS filtering
- Traffic monitoring
- VPN encryption
Realistic Role for This Router
| Good for | Not good for |
|---|---|
| ISP modem / ONT | Homelab firewall |
| Wi-Fi access point | Network segmentation |
| Simple home router | Security monitoring |
Before: Every Packet Goes Through a Black Box

After: OPNsense in the Path

Now every packet flows through a firewall you control. You can log it, block it, inspect it, and alert on it.
Hardware: MiniPC T9 Plus (Intel N100)
The N100 is an ideal edge firewall platform:
| Spec | Value |
|---|---|
| CPU | Intel N100 (4 cores, Alder Lake-N) |
| TDP | ~6W |
| RAM | 16GB DDR5 (model-dependent) |
| Storage | 256GB NVMe (plenty for Proxmox + OPNsense) |
| NICs | 2x Realtek RTL8111/8168 (GbE) |
Two physical NICs mean one dedicated WAN port and one dedicated LAN port — exactly what a firewall needs. GbE is sufficient; FPT’s optical plans top out around 1Gbps.
Why Proxmox Instead of Bare-Metal OPNsense
This is the most important section in the guide. If you try to install OPNsense directly on the T9 Plus, you will hit a wall.
OPNsense is built on FreeBSD. While FreeBSD has an re driver for RTL8111/8168, certain revisions of these NICs can behave unreliably — dropped packets, link flapping, or failure to initialize. On the T9 Plus specifically, bare-metal OPNsense had NIC stability issues.
The fix: install Proxmox (Linux) first. Proxmox handles the RTL8111/8168 NICs natively via the r8169 driver, bridges the physical NICs at the Linux layer, and presents VirtIO network devices to the OPNsense VM. FreeBSD has excellent VirtIO support. Problem bypassed entirely.
To confirm your NIC model in Proxmox shell:
lspci | grep EthernetExpected output on the T9 Plus:
01:00.0 Ethernet controller: Realtek Semiconductor Co., Ltd. RTL8111/8168/8211/8411 PCI Express Gigabit Ethernet Controller (rev 15)
04:00.0 Ethernet controller: Realtek Semiconductor Co., Ltd. RTL8111/8168/8211/8411 PCI Express Gigabit Ethernet Controller (rev 15)
Network Design
Before touching any config, understand how traffic flows through the stack:
- Proxmox bridges
nic0→vmbr0(LAN) - Proxmox bridges
nic1→vmbr1(WAN) - OPNsense VM gets two VirtIO NICs attached to those bridges

Step 1: Install Proxmox and Configure Bridges
Install Proxmox VE from the official ISO onto the N100. Before creating the OPNsense VM, verify the network devices in System -> Network.
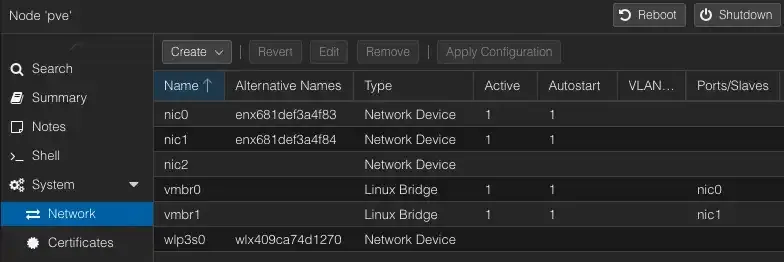
nic0 and nic1 are the physical NICs. Create a Linux Bridge for each - vmbr0 and vmbr1 - and make sure both are marked Active and Autostart.
Verify the bridge configuration in /etc/network/interfaces:
auto lo
iface lo inet loopback

auto nic0
iface nic0 inet manual

auto nic1
iface nic1 inet manual

auto vmbr0
iface vmbr0 inet static
	address 10.10.1.2/24
	gateway 10.10.1.1
	bridge-ports nic0
	bridge-stp off
	bridge-fd 0

auto vmbr1
iface vmbr1 inet manual
	bridge-ports nic1
	bridge-stp off
	bridge-fd 0
ip link show
1: lo: <LOOPBACK,UP,LOWER_UP> mtu 65536 qdisc noqueue state UNKNOWN mode DEFAULT group default qlen 1000
link/loopback 00:00:00:00:00:00 brd 00:00:00:00:00:00
2: nic0: <BROADCAST,MULTICAST,UP,LOWER_UP> mtu 1500 qdisc fq_codel master vmbr0 state UP mode DEFAULT group default qlen 1000
link/ether 68:1d:ef:3a:4f:83 brd ff:ff:ff:ff:ff:ff
altname enx681def3a4f83
3: nic1: <BROADCAST,MULTICAST,UP,LOWER_UP> mtu 1500 qdisc fq_codel master vmbr1 state UP mode DEFAULT group default qlen 1000
link/ether 68:1d:ef:3a:4f:84 brd ff:ff:ff:ff:ff:ff
altname enx681def3a4f84
4: wlp3s0: <BROADCAST,MULTICAST> mtu 1500 qdisc noop state DOWN mode DEFAULT group default qlen 1000
link/ether 40:9c:a7:4d:12:70 brd ff:ff:ff:ff:ff:ff
altname wlx409ca74d1270
5: vmbr0: <BROADCAST,MULTICAST,UP,LOWER_UP> mtu 1500 qdisc noqueue state UP mode DEFAULT group default qlen 1000
link/ether 68:1d:ef:3a:4f:83 brd ff:ff:ff:ff:ff:ff
6: vmbr1: <BROADCAST,MULTICAST,UP,LOWER_UP> mtu 1500 qdisc noqueue state UP mode DEFAULT group default qlen 1000
link/ether 68:1d:ef:3a:4f:84 brd ff:ff:ff:ff:ff:ff
7: tap100i0: <BROADCAST,MULTICAST,PROMISC,UP,LOWER_UP> mtu 1500 qdisc fq_codel master vmbr0 state UNKNOWN mode DEFAULT group default qlen 1000
link/ether 7a:d9:99:9d:c0:94 brd ff:ff:ff:ff:ff:ff
8: tap100i1: <BROADCAST,MULTICAST,PROMISC,UP,LOWER_UP> mtu 1500 qdisc fq_codel master vmbr1 state UNKNOWN mode DEFAULT group default qlen 1000
link/ether 06:87:57:63:56:75 brd ff:ff:ff:ff:ff:ffStep 2: Create the OPNsense VM
Download OPNsense ISO
From the OPNsense download page, grab the amd64 DVD image (.iso). Extract it, and upload it to Proxmox local storage via Datacenter → Storage → ISO Images → Upload.
VM Settings
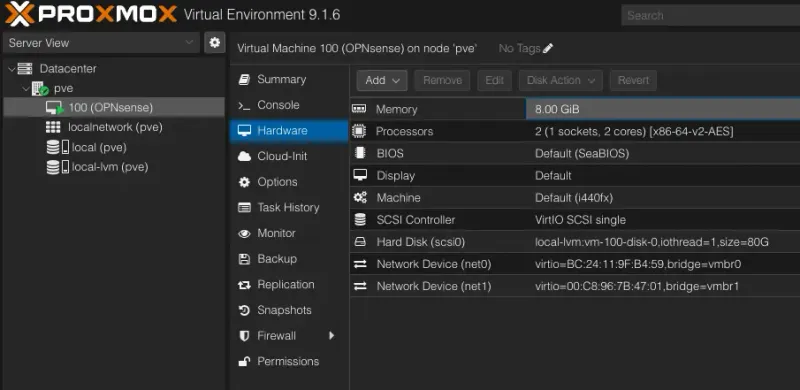
Create a new VM with these specs:
| Setting | Value |
|---|---|
| OS | FreeBSD 14 (64-bit) |
| vCPUs | 2 |
| RAM | 8GB (2GB minimum) |
| Disk | 80GB |
| SCSI controller | VirtIO SCSI |
| Network Device (net0) | virtio / bridge=vmbr0 (LAN) |
| Network Device (net1) | virtio / bridge=vmbr1 (WAN) |
The NIC model matters — pick VirtIO for both, not e1000 or RTL8139.
Boot the VM from the ISO and run through the OPNsense installer. Accept defaults for disk layout. Installation takes 2–3 minutes.
Step 3: Initial OPNsense Configuration
After the installer finishes, reboot and eject the ISO. OPNsense boots to a console prompt.
Assign Interfaces
At the first-boot prompt, assign interfaces:
Do you want to configure VLANs now? → n
Enter the WAN interface name or 'a' for auto-detection: vtnet1
Enter the LAN interface name or 'a' for auto-detection: vtnet0
OPNsense maps vtnet1 to WAN (via vmbr1/nic1) and vtnet0 to LAN (via vmbr0/nic0). Confirm.
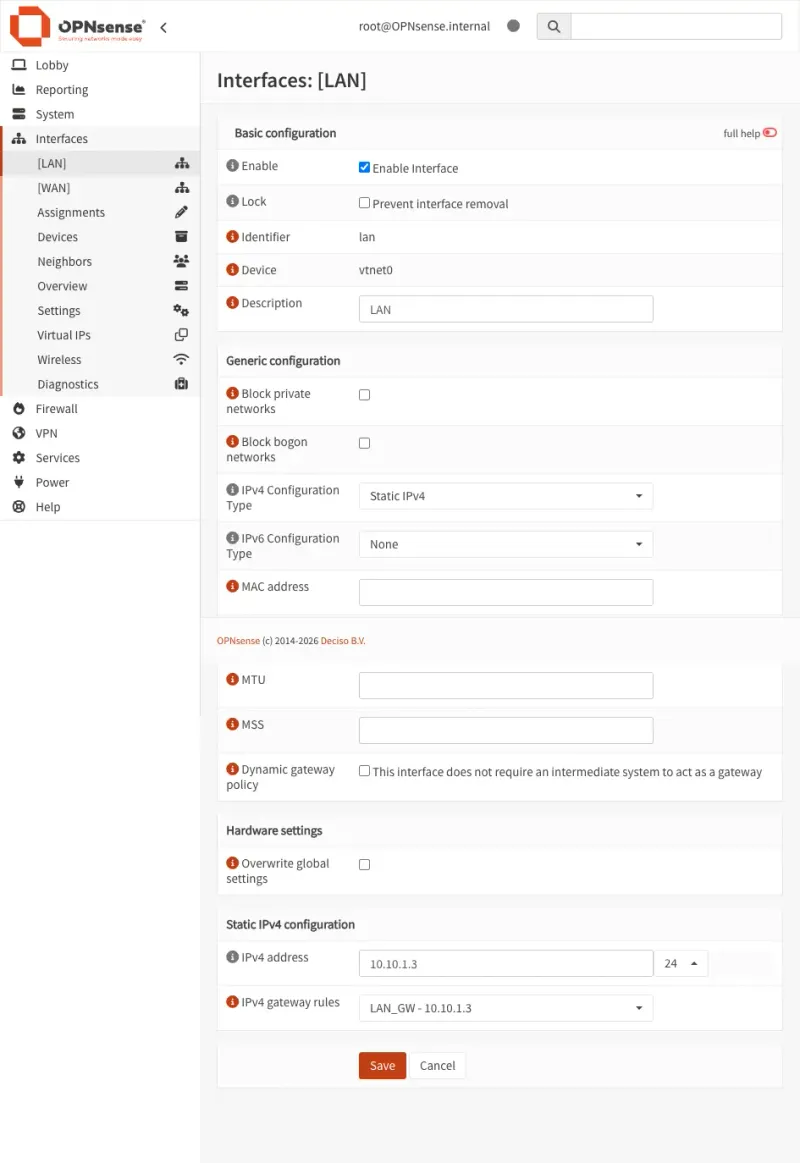
Set LAN IP
From the console menu, select 2) Set interface(s) IP address, then LAN. Set:
- IP:
10.10.1.3 - Subnet:
24 - Enable DHCP server on LAN: yes
- DHCP pool start:
10.10.1.60 - DHCP pool end:
10.10.1.250
The DHCP range starts at .60 to reserve 10.10.1.1-59 for static assignments - useful for services and VMs that need a fixed address.
Configure WAN (PPPoE for FPT)
FPT Vietnam uses PPPoE, not DHCP. From the web UI (after connecting a PC to the LAN port on the T9 Plus):
- Navigate to
https://10.10.1.3and log in (default:root/opnsense)- Change the default admin credentials immediately after your first login
- Go to Interfaces → WAN
- Set IPv4 Configuration Type to
PPPoE - Enter your FPT username and password (provided by FPT)
- Grab the Mac address of the AX3000CV2 and set it to the Mac address field
- FPT may require the original router’s MAC address to authorize the PPPoE session
- Save and apply
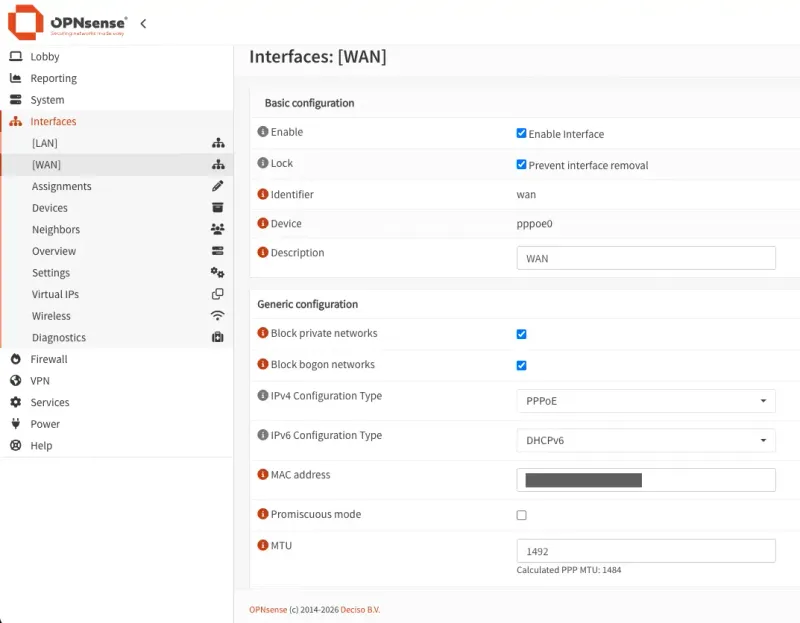
FPT uses PPPoE — not plain DHCP. If you leave WAN on DHCP, you will not get an IP and will have no internet. Double-check your PPPoE credentials from your FPT contract or support ticket.
Step 4: Enable DHCP and Connect Devices
With the DHCP server running on LAN (10.10.1.60–250), connect your switch to the T9 Plus LAN port. Devices plugging into the switch will get IPs from OPNsense.
Verify a client gets an address:
ipconfig getifaddr en0
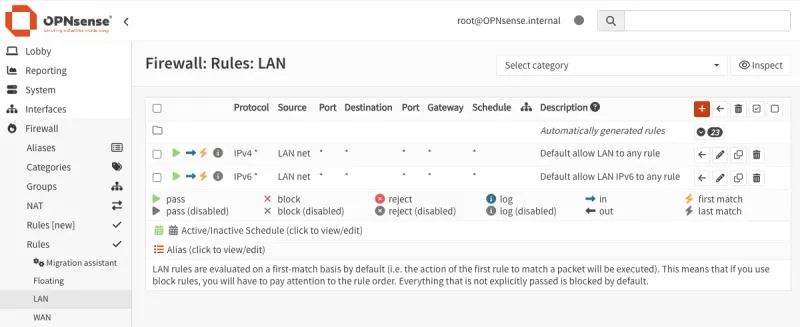
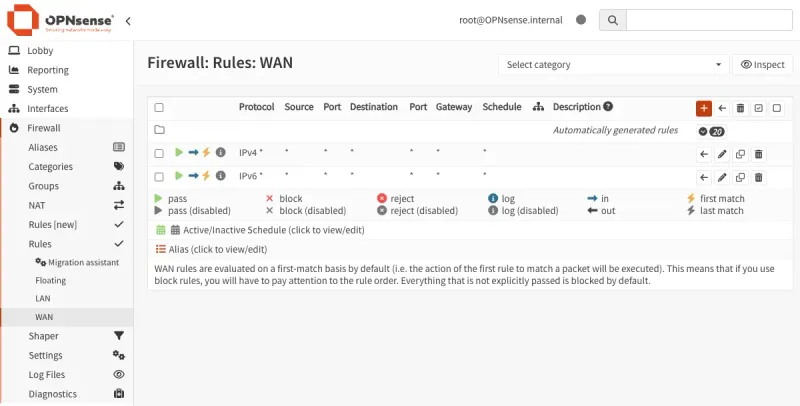
10.10.1.190Step 5: Set up Firewall rules
By default, OPNsense blocks all traffic. You need explicit rules to allow LAN devices to reach the internet and to let WAN responses flow back.
LAN rules - allow outbound traffic from LAN subnet (10.10.1.0/24) to any destination:
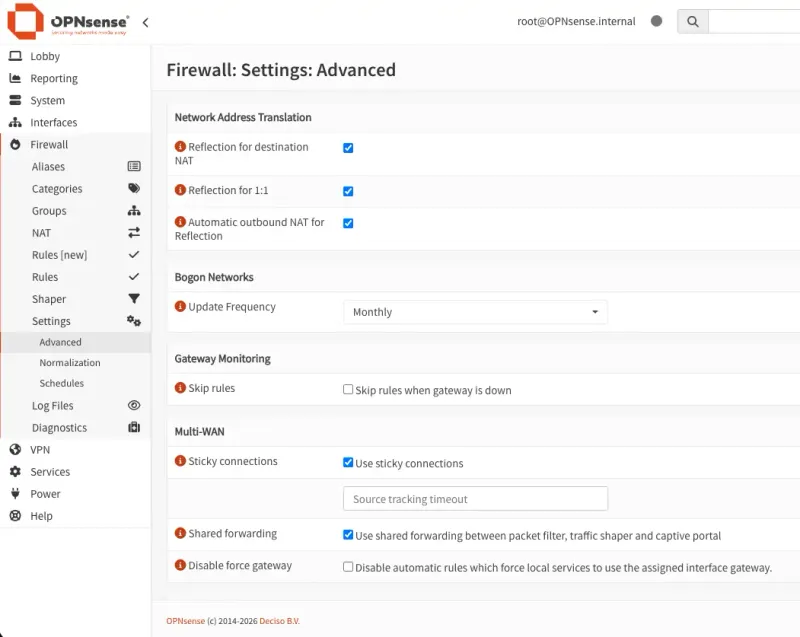
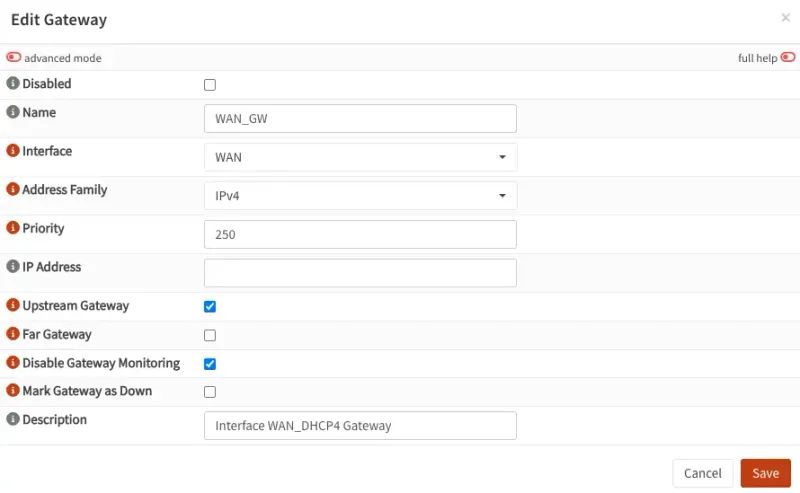
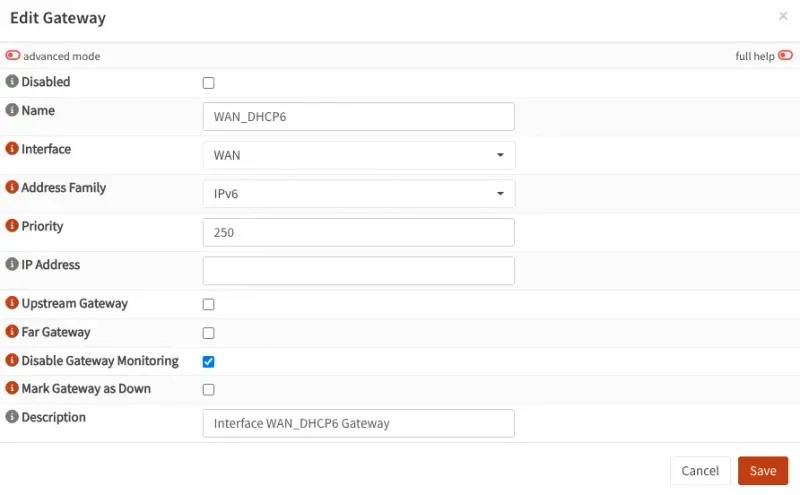
Step 6: Configure the Gateways
OPNsense needs a gateway to know where to send traffic leaving your network, ensure the WAN gateway has Upstream checked - this tells OPNsense to use it as the default route to the internet.
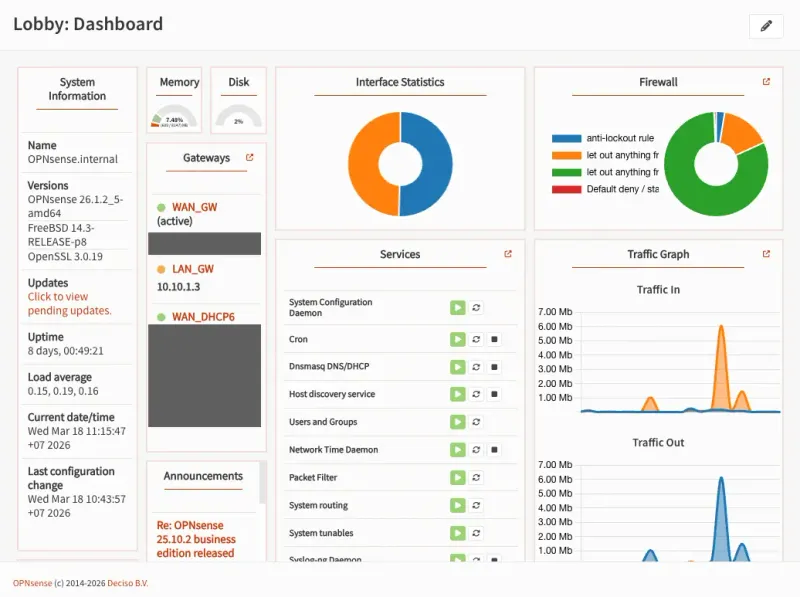
With the firewall rules and gateway in place, traffic should now flow end-to-end. Verify on the dashboard you should see active WAN and LAN interfaces with traffic counters:
Step 7: Validate Traffic Flows Through OPNsense
From a LAN device, confirm internet works and traffic routes correctly:
# Basic connectivity
ping -c 4 8.8.8.8

# Confirm routing path goes through OPNsense
traceroute 8.8.8.8

traceroute to 8.8.8.8 (8.8.8.8), 64 hops max, 40 byte packets
 1  opnsense.internal (10.10.1.3)  7.842 ms  3.190 ms  3.541 ms
 2  fpt ip (x.x.x.189)  4.877 ms  6.078 ms  4.887 ms
 3  fpt ip (x.x.x.89)  8.873 ms  7.824 ms *
In OPNsense, go to Firewall → Log Files → Live View and watch packets appear as you browse. This confirms OPNsense is in the path.
Also verify the WAN IP is a real FPT public IP: Interfaces → Overview → WAN should show an IP in FPT’s range (not 10.10.x.x).
Gotchas and Common Mistakes
| Problem | Cause | Fix |
|---|---|---|
| NICs unreliable during OPNsense install | RTL8111/8168 re driver issues on FreeBSD | Use Proxmox + VirtIO NICs |
| No internet after WAN setup | FPT uses PPPoE, not DHCP | Set WAN to PPPoE with correct credentials |
| Wrong WAN/LAN assignment | VirtIO MAC order matters | Check interface MACs in Proxmox vs OPNsense console |
| Proxmox management lost | Bridge config error | Console access via Proxmox web shell, check /etc/network/interfaces |
| NIC names differ | Kernel enumeration order | Run ip link show to confirm names before editing bridge config |
What’s Next
OPNsense is running. Now extend it.
The companion post OPNsense Exploring: Fundamentals dives deeper into OPNsense’s core features - firewall rules, aliases, NAT, and DNS configuration.
If you want visibility into the Proxmox host running OPNsense — CPU, RAM, storage, and alerts — the Monitoring Proxmox with Grafana Stack guide covers a full Prometheus + Grafana setup in an LXC container, with Telegram alerts and zero agents on the host.